

In this blog, I want to share my recent experience of migration of Azure AD Authentication from Federated authentication using Okta as the Identity Provider to Cloud Authentication (Pass through in my case, but similar process & principles to be followed for Password Hash Authentication).
Scenario
This post is helpful if you have below current set-up & your target is to achieve the below target state.
| Current Set-Up | Target Set-Up |
| Federated Authentication : Existing Azure AD/Office 365 tenant which is set up to have Federated authentication using any Federation provider like ADFS, Okta, Auth0, PingIdentity etc. | Cloud Authentication (PTA/PHS) : You want to set up cloud authentication using Pass-through Authentication (PTA) or using Password Hash Sync authentication. Please note that you can configure one of these authentication methods ie. both cannot exist at the same time. |
| No Azure AD Connect: You do not use Azure AD Connect to provision or synchronize users directly from AD but they are synchronized from the Identity Provider’s user store instead. E.g You are using Okta, Auth0 etc for user provisioning as well. | Configure Azure AD Connect, you want to use Azure AD Connect for user synchronization. |
This post will also explain what considerations needs to be taken while setting up Azure AD Connect. If you already are using Azure AD Connect in your current set up, then you can skip the Azure AD Connect related parts.
Challenges
Below are the main challenges ahead:
- Making sure there are no duplicates while we sync and you are able to match existing Azure AD users to their correct AD objects
- Managing the authentication mechanism change. You need to change the authentication from federated to cloud authentication and effort needs to be put in plan a smooth migration for users.
Initial Assessment
Before you begin the implementation, you need to do some assessment to find out what are the key activities involved for your migration. Answers to below questions will help you plan your activities for the migration.
| Does your existing Azure AD set up already utilize Azure AD Connect? | If answer, to above question is “Yes”, then your road ahead is very simple. But, if your answer is “No”, then you need to consider additional activity of installing and configuring Azure AD Connect in your on-premise environment. |
| Which property is mapped to immutableId / sourceAnchor used while provisioning users in your existing set -up? | Azure AD has an attribute called immutableId, this attribute is used to uniquely identify an Azure AD Object with same Object in your On-Premise AD. If the existing installation is good, then there is a good chance that immutableId might be mapped to your objectGUID attribute of AD. But , you need to find out the mapping from your existing provisioning mechanism and confirm which attribute is the sourceAnchor. |
| How will you match your existing Azure AD objects to same objects in AD using Azure AD Connect or what will be your sourceAnchor attribute while installing Azure AD Connect? | Once you know which attribute was mapped to immutableId, you have to decide how you will match users during the Azure AD Connect installation. There are 2 possible ways Azure AD Connect will try to match the users: Hard Matching: Attempted first, based on the sourceAnchor configured during the Azure AD Connect installation. If it is not able to resolve user, then soft matching is applied. Soft Matching: Soft matching is done with userPrincipalName and proxyaddresses attributes. Azure AD, prefers to use ms-DS-Consistencyguid or objectGUID as the sourceAnchor attribute choices, but it does allow a lot of other AD attributes to be chosen as sourceAnchor. If possible, try to stick to one of the 2 above which are promoted by Microsoft. Read this blog by Sander Berkouwer which explains User Matching in Azure AD Connect. It helped me big time! |
| Which AD attribute will be mapped to Azure AD userPrincipalName? | The value you choose for userPrincipalName in Azure AD will be used by users during the login process as username. In Azure AD, userPrincipalname value must be in format of email address e.g emailformat@company.com. It is recommended to have userPrincipalName, mail and proxyaddress attributes in Azure AD to have same mail value. So, if in your AD the userPrincipalName value is not the same as mail , then you need to consider mapping AD mail attribute to userPrincipalName. |
Changing the User Provisioning Mechanism
Now, if you do not have an existing Azure AD connect set up, the first thing you need to attempt is to install and configure Azure AD connect. Below is the high level steps you need to perform.
- Disable any active synchronization mechanism (Some directory to Azure AD) which is in place now.
- Run IdFix tool to understand any issues in your AD.
- Download and Install the Azure AD Connect tool in your server. Installation steps here. Below are few tips to consider while configuring Azure AD connect:
- Do not choose Express setting, as you can manually configure and see the settings. Also, if your target is PTA do not choose Express settings.
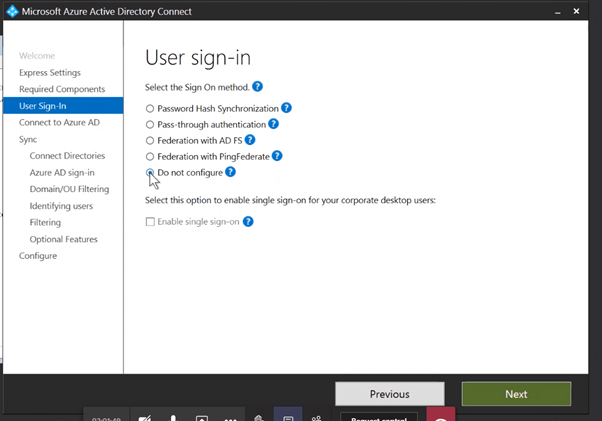
- In User Sign-in screen, select Do not configure. As you are still running the existing federated authentication. You will enabled Sign-on method later stage when you configure the Cloud authentication agents.
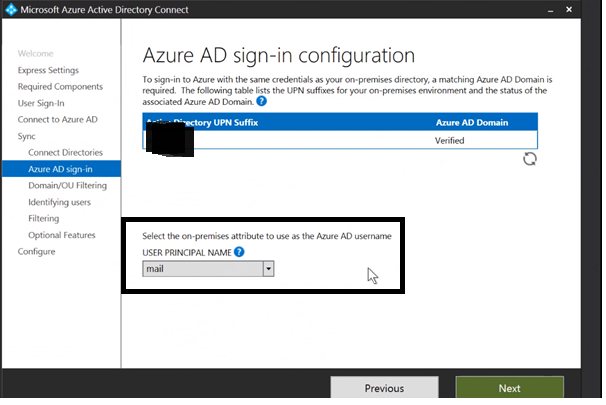
- Choose the correct USER PRINCIPAL NAME mapping in Azure AD Sign-In screen, during the installation as the screen is not available afterwards.
- Choose AD Group Filtering, to first sync a pilot group of users to Azure AD. Please note that in Domain/OU filtering , the pilot AD group should be part of the OU path which is enabled. This screen is also not available afterwards , if you did not configure during installation.
- You can first configure Azure AD connect in Staging mode, to analyse the results in the metaverse. This will help you to also identify and fix any matching issues before you sync users to Azure AD.
- Once Azure AD Connect is installed and till you are not done with testing and completely synchronizing users , you still run a risk of accidentally deleting users from Azure AD . e.g you may unknowingly deselect a previously selected OU , then all users from the OU will be removed from Azure AD. To prevent that you need to set up accidental deletion threshold. It is set to 500 by default, but you can lower it to a smaller value till you are completely out of the jungle.
Enable-ADSyncExportDeletionThreshold -DeletionThreshold 5
Once, you synchronize all users through Azure AD Connect and there are no matching issues and all Azure AD users are properly matched to their AD objects, you are good to start with the Authentication change.
Changing the Authentication
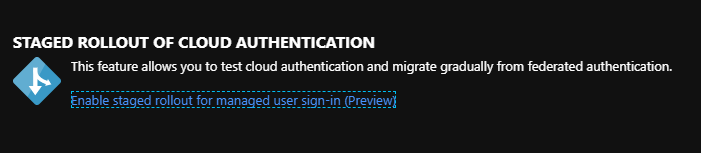
Changing the authentication mechanism from Federation to Cloud authentication is less painful now thanks to Azure AD Staged Roll-out Feature. This feature as the name suggests allows us to migrate selectively few test user groups from federation to cloud authentication. This will help you to test the new set up with selected pilot users and also allows us to migrate users in smaller chunks rather than a big bang migration. The main Caveats to consider here is that this only works for users provisioned via Azure AD connect. So you need to set up Azure Ad connect before attempting this. Read Full details of this feature on Microsoft Documentation
Before you enable Staged roll-out, you need to Download and Install Azure AD Pass-through agent. See Documentation
To enable staged roll out , you need to login to Azure AD Portal and select Azure Active Directory -> Azure AD Connect Blade
In the Staged rollout features page, switch on your preferred Cloud authentication method.
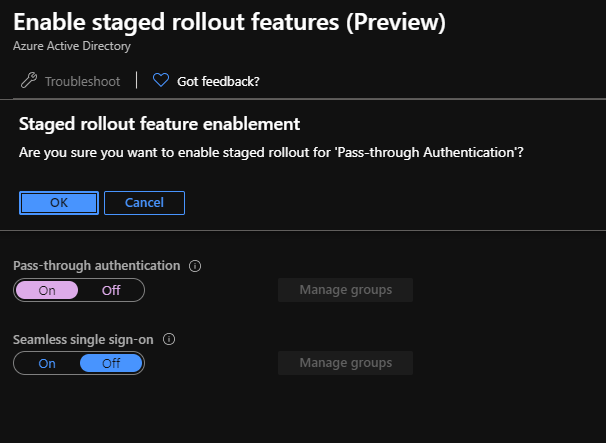
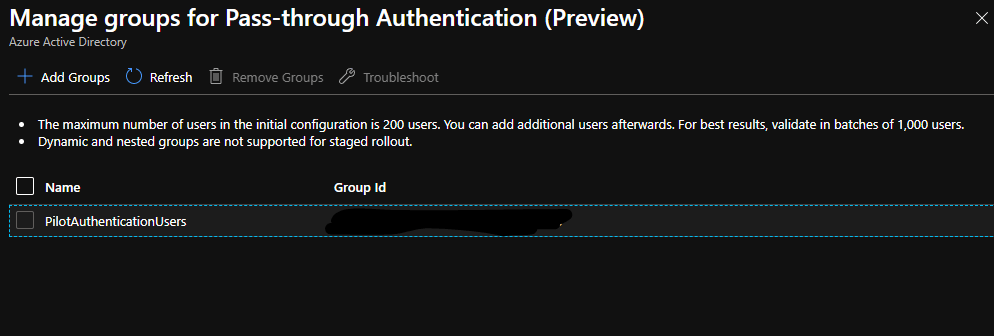
Once enabled, click on Manage groups to specify the Azure AD group which will be piloting the new authentication mechanism.
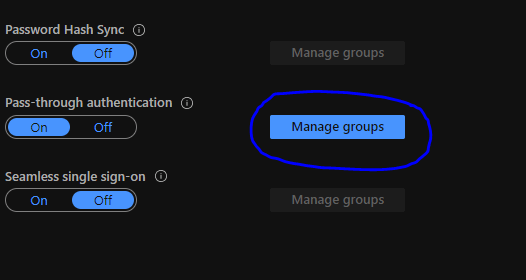
Then you can add multiple Azure AD groups into the list and those users will then be migrated to cloud authentication.
Now, it takes sometime for this change to take effect, depending on users in the group. then, you will notice that users in the group will no longer be routed to Federation provider’s login page but rather Azure AD login page will prompt for the password.

Leave a comment