

Skip the blog and jump to code here
I am about to develop a new application on SharePoint 2013 and for a while I have not worked on 2013 platform. The application will essentially have a bunch of client side web-parts using Content Editor Webpart of SharePoint 2013. I have been working on Typescript with Angular 5 for past 2 years, so thought it would be good idea to develop the SharePoint 2013 client side solutions using Typescript. I found it tricky because SharePoint 2013 does not have good tooling to support web part development using Typescript, but nevertheless after couple of days of scratching my head, I have my starter pack to develop thesolution.
Prerequisites
- Any file editor/IDE : You can use any IDE you prefer, I use VS Code bcoz I find it very easy to use & would recommend to use it if you don’t have an IDE installed.
- Node.js & NPM : When you install Node.js, NPM gets installed by default if you did not opt out.
Create your project
Now if you have the prerequisites installed, it’s time to create the project. Go to the folder where you want to create your solution and create a folder with the project name, or open the command window there and type below command
mkdir <solution name>
eg: mkdir TypeScript2013
Now open that folder in VS Code (or any IDE) & also open that folder in a command prompt. Type below command & follow the instructions in screen to create an empty package.json file
npm init
Now you will see that an package.json file will be created as below:
{
  "name": "typescript2013",
  "version": "1.0.0",
  "description": "",
  "main": "index.js",
  "scripts": {
    "test": "test"
  },
  "author": "Unnie",
  "license": "ISC"
}
Now we need to install our first dependency for the project, which is typescript.
npm install --save-dev typescript
Now let’s create the tsconfig.json by running below command (Only works if you have typescript installed globally, if not you can create the file manually)
tsc --init
Now let’s create our SP 2013 Webpart solution. Let’s create a top level folder called “app” and add each webpart as a folder with all related files for that webpart inside that folder. So, now let’s create a sample Hello world webpart as below. Create a helloworld.html, helloworld.ts and helloworld.service.ts files inside a helloworld folder.

Now, let’s add below dummy html into the file as below and add Jquery for some basic operations.
<html>
<head>
<title>Hello world webpart</title>
<script type="text/javascript" src="https://cdnjs.cloudflare.com/ajax/libs/jquery/3.3.1/jquery.js"></script>
</head>
<body>
<h1>This is a hello world webpart</h1>
<h2>Data returned from service is: <span id="spanTitle"></span></h2>
</body>
</html>
Now in the helloworld.service.ts file add below code to create a HelloworldService class and create a method called GetData() which will return some dummy data for now.
export class HelloworldService {
    constructor() {
    }
    static GetData():string {
            return `Hello world dummy data`;
    }
}
Now in the helloworld.ts file add below code to call the HelloworldService . GetData() method and just display the data returned by service into the UI.
import {HelloworldService} from './helloworld.service';
declare var $:any;
export class Helloworld {
    static onLoad():void {
    var data= HelloworldService.GetData(); //get data from the service
     $("#spanTitle").text(data);
    }
}
// call the Helloworld on load method
Helloworld.onLoad();
Now we have some basic dummy code for us to start with, but it is in typescript and we need to convert this typescript code into JavaScript to run it on browsers. There are many options for compiling typescript to JavaScript, but I will use webpack as it does many more things which will be required for the project in future.
So let’s install webpack, webpack-cli & ts-loader.
npm install --save-dev webpack
npm install --save-dev webpack-cli
npm install --save-dev ts-loader // typescript loader for webpack
Now, let’s create a webpack.config.js file in the root folder of the project manually, as below.
const path = require('path');
module.exports = {
  entry: {
    helloworld:'./app/helloworld/helloworld.ts'
  },
  module: {
    rules: [
      {
        test: /\.tsx?$/,
        use: 'ts-loader',
        exclude: /node_modules/
      }
    ]
  },
  resolve: {
    extensions: [ '.ts', '.js' ]
  },
  target: "node",
  externals: {
  },
  output: {
    filename: '[name]-bundle.js',
    path: path.resolve(__dirname, 'dist')
  }
};
With above configuration,we will have one bundle for each webpart and the bundles will be outputted inside a dist folder. Webpack will find out all depended modules for the helloworld and create a JavaScript bundle.
Now let’s go to package.json file and add below line to the scripts section, so that we can run build using the command npm run build
 "scripts": {
    "build": "./node_modules/.bin/webpack"
  },
Now run below command.
npm run build
You can see that the helloworld.ts is transpiled and bundled into helloworld-bundle.js and placed inside a dist folder.

So far so good but we still do not have the reference to load the generated bundle inside the html file. For this we use a plugin called html-webpack-plugin. This allows us to define a html template for each output chunk (or webpart for us 🙂 )
npm install --save-dev html-webpack-plugin
Now edit the webpack.config.ts file and add below lines.
//top of the file
 const HtmlWebpackPlugin = require('html-webpack-plugin')
//add below after output property in module.exports

plugins: [
    new HtmlWebpackPlugin({  //
      filename: 'helloworld.html', // name of the output file
      chunks:['helloworld'], // name of the entry point defined above
      template: './app/helloworld/helloworld.html' // path to the html for the webpart
    })]
Now run the build again and we can see that dist folder now has the html file copied as well and a script reference to the generated bundle file.

Now this is all local we want this output bundle together with the html file to be uploaded to SharePoint, so that we can test it.
To save the output to SharePoint we use a webpack plugin called spsave-webpack-plugin
npm install --save-dev spsave-webpack-plugin
Now go to the webpack.config.js file and make below modification. Add below line on the top of the file.
const SPSaveWebpackPlugin = require('spsave-webpack-plugin');
Now in the module.exports after the output section add a section to configure the plugin as below.
plugins: [
    new HtmlWebpackPlugin({  // Also generate a test.html
      filename: 'helloworld.html', // name of the output file
      chunks:['helloworld'], // name of the entry point defined above
      template: './app/helloworld/helloworld.html' // path to the html for the webpart
    }),
    new SPSaveWebpackPlugin({
      "coreOptions": {
          "checkin": true,
          "checkinType": 1,
          "siteUrl": "https://siteurl"
      },
      "credentialOptions": null,
      "fileOptions": {
          "folder": "Style Library/webparts"
      }
  })]
We need to make one more small adjustment , so that the html generated has the correct path to the webpart Javascript bundle inside SharePoint. So add a publicPath attribute to the output property of the webpack configuration.
output: {
    publicPath:'https://siteurl/Style Library/webparts', // to get correct path inside sharepoint
    filename: '[name]-bundle.js',
    path: path.resolve(__dirname, 'dist')
  },
Note that the public path should be matching with the SharePoint folder path where the bundle will be uploaded.
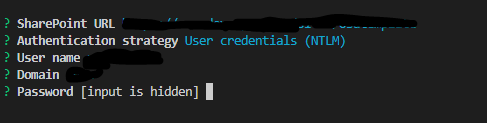
Now let’s run the build again and this time you will be asked to provide the credentials for the SharePoint site. The credentials will be stored encrypted in your computer outside of the project folder, so no worries about checking in the code!
Once the credentials are passed , the files will be uploaded to SharePoint!

Also, if you go inside the dist folder and see the html, it will have the script tag loading the JavaScript bundle generated by webpack.

Now you can refer this html into a Content editor webpart to see it working and check the screen to see the dummy message returned by the service is displayed.

Now this is very basic set up and one important part is not yet done, i.e making this webpart work against SharePoint APIs. For this I will be using
pnpjs . So let’s install pnpjs by running below command.
npm install --save @pnp/pnpjs
Now, inside helloworld.service.ts file, let’s import pnpjs and change the GetData() method, so that it returns the title of the SharePoint site instead of some dummy string.
 //Code for : hellworld.service.ts
import pnp from '@pnp/pnpjs';
 export class HelloworldService {
    constructor() {
    }
    static GetData():Promise<any> {
        return pnp.sp.web.get();
    }
}
Now change the helloworld.ts file to adjust to the above code change.
 import {HelloworldService} from './helloworld.service';
export class Helloworld {
    static onLoad():void {
    HelloworldService.GetData().then(web=> {
         $("#spanTitle").text(web.Title);
    });
    }
}
// call the Helloworld on load method
Helloworld.onLoad();
Now by default when webpack compiles the webpart, it will see that pnpjs is a dependency for HelloworldService and it will add pnpjs into the bundle. This can make our bundle size big. So it is recommended to exclude pnpjs and other external libraries from the bundle and load these from a CDN. So let’s make below changes so that pnpjs is not included in the bundle.
 //in the webpack.config.js, mark pnp as external
externals:{
    '@pnp/pnpjs': 'pnp'
  },
In the html file of the webpart load polyfills & pnpjs from the CDN.
<script type="text/javascript" src="https://cdnjs.cloudflare.com/ajax/libs/js-polyfills/0.1.42/polyfill.js" ></script>
<script type="text/javascript" src="https://cdnjs.cloudflare.com/ajax/libs/pnp-pnpjs/1.2.7/pnpjs.es5.umd.bundle.min.js" ></script>
<script type="text/javascript" src="https://cdnjs.cloudflare.com/ajax/libs/jquery/3.3.1/jquery.js"></script>
Repeat the same steps for any external libraries.Now build the solution, you can see that the bundles does not include pnpjs code and now check the hello world webpart in the SharePoint page and it shows the title of the current site.

Now if you want to add more webparts , create another folder for that webpart and add another entry point for that webpart, also new HtmlWebpackPlugin inside plugins. Below is how webpack.config will look like. e.g: I am adding another weather webpart
const path = require('path');
const HtmlWebpackPlugin = require('html-webpack-plugin');
const SPSaveWebpackPlugin = require('spsave-webpack-plugin');
module.exports = {
  entry: {
    helloworld:'./app/helloworld/helloworld.ts',
    weather:'./app/weather/weather.ts'
  },
  module: {
    rules: [
      {
        test: /\.tsx?$/,
        use: 'ts-loader',
        exclude: /node_modules/
      }
    ]
  },
  resolve: {
    extensions: [ '.ts', '.js' ]
  },
  target: "node",
   externals:{
    '@pnp/pnpjs': 'pnp'
  },
  output: {
    publicPath:'https://siteurl/Style Library/webparts', // to get correct path inside sharepoint
    filename: '[name]-bundle.js',
    path: path.resolve(__dirname, 'dist')
  },
  plugins: [
    new HtmlWebpackPlugin({
      filename: 'helloworld.html', // name of the output file
      chunks:['helloworld'], // name of the entry point defined above
      template: './app/helloworld/helloworld.html' // path to the html for the webpart
    }),
    new HtmlWebpackPlugin({
      filename: 'weather.html', // name of the output file
      chunks:['weather'], // name of the entry point defined above
      template: './app/weather/weather.html' // path to the html for the webpart
    }),
    new SPSaveWebpackPlugin({
      "coreOptions": {
          "checkin": true,
          "checkinType": 1,
          "siteUrl": "https://siteurl"
      },
      "credentialOptions": null,
      "fileOptions": {
          "folder": "Style Library/webparts"
      }
  })]
};
When I build again with multiple webparts, the output folder will have now 2 bundles and 2 html files.

I hope this gives a starting point for building webparts using Typescript/PnP in SharePoint 2013.
You can see the full code in this Github Repo

Leave a reply to Meshal Saleh Cancel reply